Pages

Wednesday, November 30, 2011

Happy Birthday Zac!

I can't believe it...
Photobucket
My baby is 4.
How did that happen??
It seems like yesterday my mister and I were out for our last pre-parent dinner, talking about how we weren't ready for what was about to happen.
That was yesterday... not 4 years ago!

To Zachary,
You are the sweetest little boy I know with such a sensitive heart. You make my heart swell daily with your little encouraging comments and unprompted hugs.
You are a such a gift from God for daddy and I and we wouldn't trade you for the world.
Happy Birthday my little Green Bat.
xo
Mommy

Tuesday, November 29, 2011

Bits & Pieces

Photobucket


To say my weekend was a blur is such an understatement!
I'm still coming to terms with the fact that it actually happened and it's over now.
It will for sure be listed as one of my top five best weekends for a while. 
It was full of laughs, inspiration, lazy mornings, good food, showers with the door shut and no one screaming at me on the other side and only a few panic attacks.

I flew to Toronto Friday morning to meet my mom for a trip to the One of a Kind craft show.
I was so super excited about this trip I've been loosing sleep for about a month now in anticipation. One of the biggest hurdles was concurring my issues with flying. 
I hate flying, and this was the first time I flew all by myself (I'm such a big girl!) with no one to distract me (my mister) or for me to fuss over (the boys). I thought it would be ok as I would be able to concentrate on things I enjoy and distract myself with "me" things.
After many hours spent in the washroom emptying the contents of my stomach, I discovered the plane ride may not be as magical as I had originally anticipated!
I did manage though, arriving in Toronto with a headache that could have split my body in half and shaking so bad I could barely stand. 
We went straight to the hotel where I ate something, showered and had a quick rest on the most comfortable pillows imaginable!
Once I was feeling better and my stress levels came back within a normal range we headed to the show and did an initial scout of the venders and everything the show offered.

Oh.My.

I couldn't wait to get back there first thing Saturday and spend hours chatting with the venders and spending all the money my mister so sweetly sent me with.
After we were exhausted from the show and my brain could hold no more ideas we headed to the cemetery where my Great Aunt was buried.
She was more like a grandmother to me and it was important to me to stop by and check on her.
We went out for dinner and then made our way to a shopping mall that we wandered around until they closed. 
A full day of walking, spending a ton of money, along with inspiration overload made for a very tired lady! 

Sunday morning we only had time to eat breakfast and then head over to the airport. I was able to get a lovely Peppermint Mocha from Starbucks and semi tame my nerves to get back on the plane and come home to my 3 boys who had an awesome "Boys Weekend".
I am happy to say that the flight home was much smoother then the flight there as far as my sanity. I only freaked out once and  was able to knock the nerves out of my stomach within 30 minutes!!
It was the Starbucks trip I'm sure. 
Starbucks makes everything ok.

Needless to say my head is positively spinning with ideas from the show and I can not wait to hunker down and plan out what I want to make next.

Did you do anything exciting last weekend?

Monday, November 28, 2011

Musical Monday: Zac Brown Band - Colder Weather

When Zac was 5 months old my mister had to leave for 6 months to do intensive training for his job. While he was away I lived with my parents outside of town and spent a lot of time in the car, listening to music driving back and forth from my parents, my in laws, play groups and any other activity we were involved in.
I listened to a few specific bands a lot in the car during that time. Usually anything my mister preferred or reminded me of him. 
The Zac Brown Band was one of those bands that I listened to all the time. 
It's funny how certain songs or musicians can take us back to a place in life every time you hear them.
Whenever I hear these guys sing I am right back in that car singing to Zac waiting for my mister to come home.

(the story in this song shares no significance to my story... I realize it could really be read into... oops! I just really like this song)

Thursday, November 24, 2011

Superhero Capes

Photobucket

 You simply can't celebrate a superhero's birthday party without the assistance of a superhero cape.
It's like celebrating flowers in winter... you can do it, it just makes very little sense.
In my mind a superhero party without superhero capes, makes very little sense.

I made a cape for each of the kids invited to Zac's party and am SO happy I decided to take on the commitment! It really was a simple and quick task that I think all of the kids enjoyed even more then I had anticipated!

I started by measuring Zac from his shoulders to mid calf (roughly 26").
I then went to my 1 meter of fabric and used my measuring tape similar to a protractor. I anchored it at the top corner and drew a line with a fabric marker swinging the measuring tape from one side of the fabric to the other.
I did this same thing using a 2 1/2" length at the top to form the neck hole.

When you unfold the fabric you will already see the cape shape!

If you would like a single sided cape, move on to the collar now, or if you would like a double sided cape (like I did), cut another piece to match and pin right sides together. Sew around the entire cape leaving only the neck hole open. Flip right sides out and press the edges flat.

To make the collar, cut 2 strips of fabric in a rectangular shape measuring 3" wide by 17" long. Pin, right sides together, and sew leaving one long side open.
Clip the corners on an angle, to avoid bulk.

Keeping right sides facing turn the fabric up roughly 1 inch and iron,

then turn the collar right sides out and press flat.

Stuff the neck of the cape into the opening of the collar and pin. This part can be a bit tricky but just go pin crazy and it will hold just fine. Top stitch the bottom of the collar.

You could sew velcro into the collar but I took a short cut and hot glued it.

You could also do an alternate collar by using a store bought quilt binding and tie it whenever your child goes to play. I have choking fears given that my kids pull the backs of capes all the time so I opted for the velcro.

My kids love them!!
 Even straight out of bed!

Wednesday, November 23, 2011

Photo Transfers

Photobucket

Are you familiar with The DIY Dish?
If you're not, and you like crafty things, then you totally should be.

Way back in April of 2010 a mixed media collage was featured and I have been itching to do the photo transfer ever since.
The trouble is that I have a mad fear of commitment when it comes to hanging pictures in my home and I simply could not decide what photos I wanted to try the technique using!

Recently I decided I wanted to put some sort of Superhero pictures in Zac's room and was leaning towards vintage tin signs, however I was indecisive enough about committing to specific Superhero's I decided it was the perfect time to try the technique so I could have limitless options!
It's super simple to do and looks super cool once it's completed.

Photobucket
(impressed by my fancy photo up there?? yep... I'm getting pretty handy with a computer if I don't say so myself!)
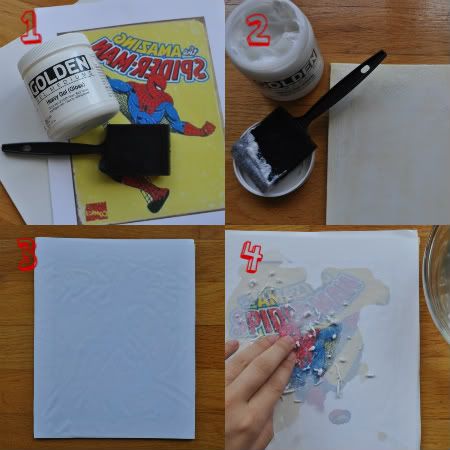
1. You'll need a painters canvas, gel medium, paint brush and your photo. Your photo must be laser printed and if it has words, printed in mirror image.
2. Cover your canvas with a thick coat of the gel medium and then press your photo, image side down, onto the medium, pushing out as many air bubbles as possible.
3. Allow to dry completely, overnight is a great time frame.
4. Dip you fingers into water and rub off the paper. This step takes some time but it's when the magic happens. Your image will stay on your canvas while you wash/scrub away all the white paper backing.

Once the canvas was dry from the water I covered it with a thin coat of mod-podge and allowed that to dry.
After the first picture was completed I got a little excited and embraced my fear of photo commitment and made a few more...

I took the glass out of a few dollar store frames and popped these babies inside for the party...

 and then to hang on the walls in both boys bedrooms.
Photobucket
I am so excited with how nicely they turned out!

A few weeks back Elsie used this same technique on material and I couldn't help myself so I made me and the mister matching shirts, for the party, as well.

(I don't recommend washing in the washing machine though... even on the gentle cycle...)

I'm kind of kicking myself for waiting so long to try this technique, it looks so cool when it's done and it's practically effortless!
Now to decide on the next photo to do this with!!

Tuesday, November 22, 2011

Superman Bunting

Photobucket

 I love buntings.
I have been looking for an excuse to make one for some time now but always found the task to be quite daunting. It seemed like it would take so much time cutting out all those triangles and sewing them all together to then connect them all...
But I could not have been more wrong!

I had some superhero-ish material sitting around so I decided to bite the bullet and try my hand at a bunting for Zac's party.
It took about 2 hours to make this baby and I love it.
I love, love, love it!

If you've ever thought about making a bunting you totally should, it's pratically effortless and so freaking adorable it's a must make in life

I took a standard size piece of paper, and found the middle of one end. I drew straight lines from the top corner of the sheet to the middle of the bottom.
Cut that out and voila! your template!

Decide how long you would like your finished bunting to be (how many triangles) and cut out double, one for the front and one for the back.

Pin 2 triangles together, right sides facing, and sew, leaving the top open.
Flip right side out and iron flat.

Once you have done this with all of your squares lay them out and measure how long they are once lined up.

Add additional length (I added 14" on either side) and cut a strip of binding your final length (I used store bought binding).

Then just sew your binding on as you would for a quilt!

Couldn't be easier!

I used it to decorate the wall above the food table at Zac's party...

and once the party was done I hung it up over his bed.

I think it's too cute!

Monday, November 21, 2011

Superhero Week

Welcome to...
Photobucket
 here on Happiness is Homemade!

Zac's 4th birthday is coming up next week and this past weekend we celebrated his milestone in a heroic way, with a superhero birthday party!
I had a great time planning the party (I always do!) and made a lot of the decorations myself.
Zac's room has needed a bit of TLC with the decorating so it worked out well to use the decorations I made for the party to spiffy up his room as well.

This week I'm going to show you everything I made, decorations and baked goodies, and have a DIY Palooza of superhero goodness!

That said it is Monday which, as you know, marks a musical intro to the week, and to get you in the spirit of things I am going "theme song" this week.
My boys love superhero's and superhero shows and their favourites are the cartoons from the 1960's.
I listen to them singing, and correcting each other on, the intros to all these cartoons all day everyday.
This is one of Eli's favourites.


Happy Monday!

Friday, November 18, 2011

Superhero's

My boys think they are superhero's.
I love comics and superhero's so when they started showing an interest, I will admit to being very excited. I really wanted the boys to come to their own love of superhero's though and didn't really encourage or focus on the masked crusaders to see how far their enjoyment would go.

It has gone further then I ever could have expected and it's officially gotten slightly embarrassing.
Both boys no longer answer to their names.
Zac has started introducing himself as Green Lantern. Occasionally he puts on his Batman cape and insists on being called Green Bat.
Eli switches his superhero up daily, Wednesday he was Captain America, yesterday Batman and today Superman. He has been running around the house this morning saying "Up, Up and Away!". 

Zac's birthday party is this weekend and it was a natural fit that it be a superhero theme. 
I've been working like crazy all week, sewing decorations, cutting masks and planning the food. 
I do love planning a party!
Next week I'm going to share each craft I made for the party and a few recipes, along with some cute photos of the party.
I'm pretty excited about it and hope you'll come back and check it out.
Have a good weekend!

Thursday, November 17, 2011

Book in Review

I feel like I am flying through my list of books to read.
Turns out if you focus on 1 book at a time (instead of 8) you actually finish them!!

A couple of weeks ago I started Little Bee by Chris Cleave.

I really wanted to like this book. All the ratings on the back were super positive and it just looked cute.
The description didn't give away too much as "the publisher's did not want to spoil" the story.

Yah... I didn't like it.

I wish I did, I really wanted to... it was just... meh.
I had no attachment to the characters and quite honestly was pretty over the "story" by about the middle of the book.
It's a story of a 16 year old girl (Little Bee) who immigrates to England after almost loosing her life to "the men" who were killing villages in Nigeria to get at the oil underneath their tribes. She is saved on a beach by the other main character, Sarah, who is having marital issues with her husband.
The story follows these two around as they try to sort out their life issues essentially...
Juuuust, not my thing...

So! Moving on!
I have found the last couple reads to be slightly disheartening in my bubble of good books. While they have all been well written, none have completely sucked me in so deep that I can get lost in the characters and the story.
And I like to get lost in books.
What's the point in reading a book if you can't get a little lost, is my opinion.
I decided that due to my current low-ish state of reading, I'm going to re-read some favorites.

I'm taking on The Hunger Games again!!!
I'm so super excited actually. They are turning this series of books into movies and I am beside myself with excitement about them.
Some people have Twilight, other's have Harry Potter, I have The Hunger Games.
My tummy actually does flip flops every time I watch the trailer.


Come on March 23rd!!!!

Have you read any good books lately? I'd love some suggestions!!

Wednesday, November 16, 2011

Whole Wheat Bread

I did it!
I did it and then I moon walked across my kitchen with a triumphant fist pump.
I found the perfect sandwich bread recipe.
The perfect whole wheat sandwich bread that is!
 
It has been a delicious journey through many loaves of bread, but I think I am officially ready to claim this one as a winner for my family.

Parker House Rolls are traditionally fantastic white rolls that are buttery and fluffy and straight up heavenly.
Knowing that they were a winning recipe I decided to give them a go using just whole wheat flour, skipping the rolls and just dumping the whole mound of dough into a bread pan.
Normally taking all the all purpose flour out of a recipe and swapping it with whole wheat, in its entirety, makes a dense, heavy loaf that could easily be used as a weapon to fight off household intruders.

I honestly had no real expectations or hopes when I decided to make this drastic change to the recipe so to say I was shocked when it turned out fabulous is an understatement. 
I jumped, I clapped, I giggled like a love sick teenager. 
Sad that I would get this excited about bread, yes, but the love I have for bread could also be described using the love sick teenager analogy.

I made another loaf just to be sure and it was also wonderful. Then I swapped out 3/4 cups of the whole wheat flour for some multi grain flour and that was awesome too!
I'm kind of thinking that the Parker House Rolls recipe is like the holy grail of all bread recipes. You can do anything to it to change it up but in the end it's always going to be a winner.
You should try it, and let me know if you have as much success with it as I have.
I've even swapped out the sugar for honey! sheesh! I'm telling you! I'm freaky excited about this bread. I feel like the options are limitless!

Whole Wheat Bread
3 tbsp warm water
3 tbsp sugar
1 package (2 1/2 tsp) active dry yeast
1 stick (1/2 cup) unsalted butter
1 cup milk
2 3/4 cups whole wheat (bread) flour
1 1/2 tsp salt

Stir warm water, 1 tbsp sugar and yeast together and set aside until foamy, about 5 minutes.

Melt 3/4 stick of the butter in a small saucepan and add the milk, warming until room temperature/slightly warm (looking to take the chill off the milk). Pour into a large bowl and add the yeast mixture, remaining 2 tbsp sugar, flour and salt and mix it up either with a wooden spoon or your hands (I prefer my hands... I find it easier to gage if I need more flour or not if I'm elbow deep in the bread making process). 

Dump the dough out onto a clean surface and kneed until it's smooth adding only enough flour to keep it from sticking to the surface you are working on, roughly 5 minutes. Whole wheat bread doughs will not get as smooth as a white dough and you also want them to remain slightly sticky to the touch. If you add enough flour to take away all sticky-ness you're running the risk of adding too much making a dense/dry loaf... just sayin'...

Form the dough into a ball and plop into a greased bowl, cover with a tea towel or cling wrap and set aside until doubled in size, roughly 1 hour.

Once the dough has risen dump it out of the bowl onto a lightly floured surface and give it another quick kneed, I usually only go about 30 seconds or so, and form it into a log. Place in a greased loaf pan, cover once again and allow to raise about another hour or so until doubled in size again.

Preheat oven to 375. Bake the loaf for 35-45 minutes until the top is a nice deep golden colour and the loaf sounds hallow when you tap on it. Allow to cool in the pan for 5-10 minutes and then remove the loaf allowing it to cool on it's side.

It's great warm but if you are hoping to cut it into thin slices allow to cool completely to room temp.

Not sure if it's worth mentioning but I'm kind of old school when it comes to bread making and do it all by hand. I have a stand mixer with a hook but have horrible luck with it as I never seem to get the right consistency and always seem to add too much flour. All that to be said, if you try this recipe and it's no good the first time, try doing it again without the fancy equipment and see if it turns out differently.

I hope you make this and enjoy it as much as I did!
**recipe adapted from the Parker House Roll Recipe found in this book**

Tuesday, November 15, 2011

Movember

November marks that time on your calendars that every man loves and every woman hates.
It's Movember folks.
The time of year when men grow themselves some extra facial hair in an effort to raise awareness for men's health... and for some, just the sake of growing some nasty facial hair.
I am currently surrounded by all kinds of facial hair wierdness...
It's only natural that I felt a little pressured to join in the fun and grow myself a mustache. Trouble (perhaps not so troublesome in reality) is that I can not grow facial hair.
This means I (happily) settle for the mustache on a stick variety.
Last year I made one of these using felt, this year I decided to step it up a notch and use some fun fur for a more... voluptuous look.
I followed all the same initial steps you can find here, except instead of covering my cardboard template with felt I cut the fun fur to fit. 
When cutting fun fur it's worth mentioning that you want to try and avoid cutting the actual hairs, just the backing.
Once you've got the shape of your mustache in your fun fur, glue it to your cardboard template and allow to dry.
Once it's dry hot glue a stick to the cardboard and flip it over to style your lovely bushy mustache. You can use mustache wax or hair spray to help the fun fur stay in place once you are happy with how it looks.
And there you have it! Now you can hang with the guys.
Peace Out!
(funny how having a mustache makes you feel so much cooler...)

Monday, November 14, 2011

Musical Monday: Colbie Caillat - Falling For You

When I was younger I always wanted to be a surfer chick.
HA! Picture that one and you will laugh for sure.
It was my life plan for the longest time to go to Samoa after high school graduation for as long as my money would allow, rent a cottage on the beach and surf.
Instead I went to college and got married and learning to surf has been placed on my bucket list until further notice.

While I was going through this phase Colbie Caillat was my hero.
Her music still takes me back to my teenage state of mind!

Friday, November 11, 2011

Baked Clay

When you were little did you ever bake clay and decorate it?
I stumbled upon this idea a little while ago in one of my craft books and was all over it!
It's easily a 2 day craft, and I am all about 2 part crafts with the boys (now that the need for instant gratification has lessened), so I quickly whipped up a bunch of the clay and set the boys onto it.
I manned them with rolling pins and cookie cutters the first day...
and paint and paint brushes the second...
(whoever thought to put paint in empty ice cube trays?? Brilliant!)
They had a great amount of fun.

Baked Clay
4 cups flour
1 cup salt
1 1/2 cups water

Put the flour and salt into a bowl and pour the water over top. Mix (works best if you do this with your hands) until a clay forms. You may need to add more water, if this is the case do so 1 tbsp at a time until everything comes together.
After your kiddies have shaped their creations bake them on a cookie sheet for 3 hours in an oven set at 200. Allow to cool completely and then paint!

Thursday, November 10, 2011

3 Ways to Beautify a Clipboard

It seems like everywhere I look these days clip boards are becoming ever present.
People are using them as displays, inspiration boards and even home decor.
I've always loved clip boards (when I was little my parents gave me a red book type clipboard that I was obsessed with! It made me feel so grown up and important!) and decided that it was about time for me to get in on this clip board craze.
I wanted mine to be slightly beautified though and a little more pleasing to the eye so I decorated them in three ways that I thought you might be interested in.
I realize not everyone enjoys a pretty clip board the way I do... but you can't deny it, they just look so cute now!!
Option 1 - Cover with scrapbook paper!! 
This could not be simpler! Most scrapbook paper however is shorter then the actual clipboard so you will need to plan on using something as the trim.
Not sure how to work around the hardware at the top of the clip board?? Have no fear! Lisa is here!
(I typed up a quick little instructional that you can find here.)

Option 2 - Chalkboard Paint!!!!
I can't get enough of this stuff lately.

And lastly Option 3 - Fabric and mod-podge baby!
Put mod-podge all over the clip board, cover with your fabric and mod-podge over top! It leaves the back of the clipboard a little unfinished looking, so depending on your plans for this beauty you may want to cut an additional rectangle of fabric and mod-podge onto the back of the clip board... once the front has dried of course.

And there you have it! 
Do you feel that? the extra weight being lifted off your shoulders, that was so rudely caused by your concern over what to do with that ugly clipboard you have sitting in your office?
Yep... glad I could help.

Wednesday, November 9, 2011

Money Bags

My mister and I have always been pretty cautious with our money.
When we first married we had enough money to be comfortable but we had to spend with a little more thought then some.
When I became pregnant and went off on mat leave the first time, my mister had to pick up a second job to help make ends meet; but we figured it out and were even able to purchase our first home!
My mister's current job is wonderful money and we are super blessed with the funds he brings in however; with me not working outside of the home we tend to spend through it pretty quickly.
With the holidays coming up and the cost of travel to see our families (anytime) we once again had to buckle down and watch our spending.

We moved to a strictly cash budget (so all of our variable expenses are paid in cash and we no longer use our credit or debit cards) and were seeing results almost immediately.
Now, I know this is not my usual style of post and I'm sure you're saying "Lisa! I really don't care about your finances." This I know.
But I bet you do care about where I keep the cash!
We keep it in jars to be honest, but when we go out we tuck the bills and change into these lovely little money bags I made!
I love them!! 
I have plans to make more, but at the moment we really only need the three as we never go more then two places at a time.
Why not envelops you ask?
Have you ever put change in envelops? They fall apart pretty quickly.
I sized the bags by opening an envelop up and taking it's measurements, but I used the instructions found here to put them together.
The first time I tried to put in a zipper was a horrible experience and I've avoided it ever since. 
These instructions helped a bunch.
Who knew a zipper foot could make sewing in a zipper so easy?!
pretty amazing thing that zipper foot!

Tuesday, November 8, 2011

Oats & Molasses Bread

I like bread... well I like all carbs, but bread especially!

I've been going a bit over board in search of the perfect homemade loaf of bread (I made 8 loaves in 1 day...) and I think I may have found a contender. 
The flavor is great, it's easy to make and it cuts into thin slices easily to make sandwiches with.
It even freezes well!!

Oats & Molasses Bread
1 1/4 cup boiling water
3/4 cups rolled oats
1/3 cup molasses
2 tbsp butter (softened)
1 egg
1 tsp sugar
1/2 cup warm water
1 package instant yeast
3 cups all purpose flour
1 cup whole wheat flour
1 3/4 tsp salt

In a bowl (that wont melt) stir boiling water with the oats and let stand until all the water has been absorbed, 10-15 minutes. Add in Molasses, butter and eggs and set aside.
Dissolve sugar in warm water and sprinkle the yeast on top. Let the yeast sit for about 5-10 minutes until it's all frothy like. Stir into oat mixture. Add 2 1/2 cups of the all purpose flour, all the whole wheat flour and salt to form a sticky dough. 
Dump the dough onto a floured surface and knead until the dough is smooth and slightly elastic, using only as much of the remaining flour needed to avoid sticking.
Place in an oiled bowl, turning to grease the entire dough, cover with a tea towel and let it rise in a warm/draft free area until doubled in size... roughly 1 hour.
Grease two loaf pans and set aside.
Punch the dough down & cut in half. On a lightly floured surface pat each half into rectangles the same length as your pan. Roll into a log... or "cylinder" if you're fancy, and pinch the ends to seal them. Plop the dough into your pans and once again, cover with your tea towel and let rise another hour or so, until doubled in size.
Brush the loaves with 1 beaten egg and sprinkle with a few oats before baking in the centre of a 375 oven for roughly 40 minutes. You'll know they are done when they are a lovely golden color and they sound hollow when tapped.

This recipe can be found in this book. It's an awesome book and a great resource. I really recommend it to everyone!!

Monday, November 7, 2011

Musical Monday: JJ Heller - Where I Land

I just love JJ Heller.
I like to pretend that I have like one sixteenth of her talent... but watching my children laugh at me while I sing really leads me to believe I don't...
Perhaps I'll just learn to play the guitar...

Friday, November 4, 2011

Happy Friday

Happy Friday Everyone!
I'm a stay at home mama, so I can't say Friday holds the same feeling it used to, when I worked, but I do love knowing that tomorrow I will have someone to help entertain the boys all day.
It seems our weekends have become so busy these days they often leave us in a confused daze Sunday night wondering what happened during the last 48 hours and this weekend is going to be no exception.
I think I have written the longest "To Do" list I've given myself in a long time!

Do you have any big plans for the next 2 days? 

Thursday, November 3, 2011

Book In Review

I can officially take another book out of my "to read" pile and mark it read as I move it to the shelf.
The Girl With the Dragon Tattoo (in a nutshell) is about Mikael Blomkvist, a financial reporter and Lisbeth Salander, a private investigator. In the beginning of the book Mikael is found guilty in a libel case and is sentenced to do jail time. The dates for his sentence are not immediate and while he is waiting to go to jail he leaves his job, as a financial reporter. He is then hired by Henrik Vanger to write his family's autobiography and find the answers to the unsolved disappearance of his niece over 20 years before.

My thoughts? 
So very sweet of you to ask!

I liked it. I thought it was really well written. 
I didn't realize going in that this is book one of three but I am considering reading the next one. 
I found the character of Lisbeth a little confusing for most of the book but towards the end it is mentioned that Mikael thinks she may have Asburgers. Knowing this made it a bit easier for me to understand her character, which is the only reason I share it here - I don't think I'm ruining anything... 

And now on to the next book!
Little Bee by Chris Cleave

Have you read any good books lately?

Wednesday, November 2, 2011

Root Beer Bunt Cake

I love bunt cake. 
I love cake, but put it in a bunt pan and I love it more!
I don't know why... really, what's so special about a bunt cake?
It's like a giant donut of cake goodness that's what!

A while back we went to our neighbors for a BBQ and a bonfire and I tasked myself with bringing the dessert.
I wanted to do something a little different and I wanted to make it in a bunt pan. 
I stood in our pantry looking at everything we had, trying to think of baking possibilities, when I stopped on a can of root beer. I remembered seeing a recipe, once upon a time, for a Root Beer Bunt Cake in one of my cook books. 
I frantically surfed through all my cook books until I found that glorious recipe.
It was so good. 
I didn't think it would actually hold the Root Beer flavor, but it did, especially in the icing!


Root Beer Bunt Cake

Cake
2 cups root beer
1 cup coco powder
1/2 cup (1 stick) butter
1 1/4 white sugar
1/2 cup brown sugar
2 cups flour
1 1/4 tsp baking soda
1 tsp salt
2 eggs

Preheat oven to 325 and go crazy with non stick spray in your bunt pan.
In a large saucepan, heat the root beer, cocoa powder and butter until the butter melts. Mix in both sugars until dissolved and take the pan off the heat - let it cool.
In a bowl mix flour, baking soda and salt.
In, yet another, bowl whisk the eggs and then mix into the cooled root beer mixture.
Add the flour to the root beer mixture and gently fold until just combined - be sure not to over mix or the cake could turn out tough.
Pour the cake batter into the greased bunt pan and bake for 35-45 minutes, rotating the pan half way through baking time, until a tester comes out clean.
Transfer to a wire cooling rack and allow the cake to cool completely before trying to remove it from the pan. Once cool loosen the cake from the sides of the pan and turn it out onto the rack (or your serving platter).

Frosting
2 oz dark chocolate, melted
1/2 cup (1 stick) butter, room temp.
1/4 cup root beer
2/3 cocoa powder
2 1/2 cups powder sugar

Put everything into a food processor and pulse until the frosting is smooth and shiny.

It makes a bunch of icing, but I loaded it all up on the cake... and it was wonderful.

So. Flippin'. Delicious.
(recipe found in this book)

Tuesday, November 1, 2011

Musical Monday: Jenny & Tyler - One Eyed Cat

I'm not sure when/where I stumbled upon this song but I thoroughly enjoy it!
My musical share is a day late this week, so I thought I'd choose a song that should put a smile on your face, and if this song does not make you smile then I have no idea what will!
Happy Tuesday!!