Monday, December 20, 2010

Crafting Plans

I thought I'd share some projects I'm working on now or have plans to work on shorty.

I am IN LOVE with this little hat ornament and am trying really hard to find the time to whip up a few before Christmas...

The above photo and instructions on how to do this can be found here!

When Zac was in the hospital I made a few of these and I just have some finishing touches to do before I can hang them on the tree...

Photobucket

Instructions for the above beauty (as well as the original photo) can be found here.

I had also really hoped to do a variation on this ornament...

I'm also in mad love with these ornaments I just found out about...

Photobucket
Although I'm thinking I might be pushing the time limits if I try to fit them in before Christmas at this point...
Instructions and original pic found here.

And then to top everything off, Rachel just posted a tutorial for her dress up felt board project, and I have a huge hankering to make one!!
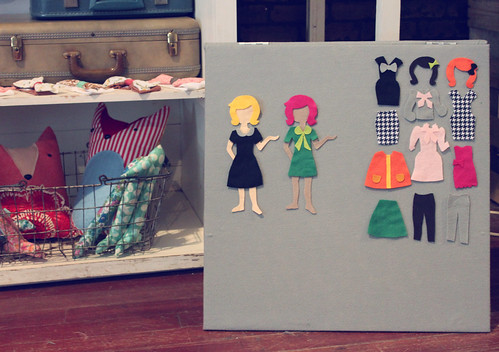
Dress Up Felt Board

Her original pic and instructions can be found here!

Ah, so many things I want to do and only a week left before Christmas!
I'm thinking I may keep making the ornaments even after Christmas and just pack them away all ready to go for next year...

Christmas is less then a week away now!
Are you ready?

Sunday, December 19, 2010

Taffy Tarts

These are SO good.
There's nothing left to say...
(except to apologize for how sloppy they look in the picture!)

Taffy Tarts
Tart Shell:
1/2 cup butter
1,2 cup margarine
1/2 cup brown sugar
2 cups flour
Mix all ingredients and roll into small balls, drop into mini tartshells and push a dent into the center using the base of the handle of a wooden spoon.
Bake at 350 for 10 minutes.

Filling:
5 McIntosh toffee bars
1/2 cup whipping cream.
Melt everything together and then spoon into the cooked tart shells.

Oh.My.Goodness!

Saturday, December 18, 2010

An Early Christmas Gift

What's that you say? An early Christmas gift?

You shouldn't have! Really...


"AHHH-PEEEE-IZE!!!!!"

He was very proud of himself, and thought this was hilarious fun!
This went on most of the afternoon...

Friday, December 17, 2010

DIY Rutt

I feel as though I've been falling behind in my crafting lately.
Trouble is, it seems my crafting green thumb has gone a little closer to black these days.

Take for example this here, ornament wreath...
I've been seeing them all over and quite enjoy how they look... trouble is mine didn't turn out so round looking...
I like to think it's because it's proven impossible to find a wreath form in my little town so I had to do a make shift one involving a wire coat hanger and some newspaper...
During the making of this it also became very apparent that I didn't have enough ornaments either, so I used everything I had in the hopes that it wouldn't silly...

In the end, I still think it looks silly...

It will still go up though... because I'm that kind of person! It's festive and shiny... I'll find some ribbon maybe and see if I can't make it look a bit fuller... and round...

I have a few ornaments I still want to try and make before Christmas Day but Eli keeps pulling everything we have hung on the tree (including the lights) off... so whether I make them this year or wait until next, is still a little up in the air...

Thursday, December 16, 2010

Embrace the Camera: Christmas Party

Zachary surprised us this year with a very high level of enthusiasm regarding Santa Clause.

Given that Zac's only 3 we haven't really played up the idea of Santa so it came as a huge surprise when he started asking when Santa was coming.
It's been so much fun to experience the magic of Santa, for the first time, from a parental view point this year!

Hubby's, work, kids Christmas party was this past Sunday and they had Santa come in to give each of the kids a gift.

Never before, have I seen Zachary so in awe of anything the way he was when Santa walked in the room!
And I love so much, that the only thing he could think to do with himself was give me a BIG hug!

When his name was called to receive his gift we had the roughest time getting him to actually look at the camera, he just wanted to stair...
(Santa has such good taste in wrapping paper, don't you think??)

Once all the gift giving was done, Santa stuck around to sing some last songs with the kids, and Zac was all over the opportunity to sit with him again. He climbed up on a chair beside him and just hung out, laughing a gut felt laugh every time Santa said anything!
Really, it was the cutest thing I think I've seen in my life so far (I know I'm a bit bias... but still!)

This is the only picture we were able to snap of the two boys with Santa, that someone is actually looking at the camera. I'm not too disappointed though, we've still got the memories!
And hey! I was even in a few of the pictures!

Wednesday, December 15, 2010

Butterscotch Blondies and Chocolate Mint Chip Cookies

More Christmas Baking!!!

This was my first attempt at "Blondies"!
They are yummy!
Go here to find the recipe for Butterscotch Blondies.

I also made these cookies but included a bag of mint chocolate chips.
...I couldn't stop eating them...

Tuesday, December 14, 2010

Recycled Wrapping Paper

A few years ago my Grandmother gave me a "Christmas Bible" book. It's mainly full of recipes and gifting ideas. One of the chapters is dedicated to wrapping gifts and has a homemade wrapping paper idea that I thought had so many possibilities. In the book it suggests buying a roll of plain coloured or white wrapping paper to complete the project, but I thought I'd just use up some extra, left over, wrapping paper we had around the house.

I know lots of people that save their used wrapping paper to reuse or are bothered by the fact that wrapping paper isn't often recyclable. So I thought I'd share this idea in the hopes that some might be able to revamp their used paper!

The things you'll need (to make a snowflake design):
Old or blank wrapping paper (I used the back side of left over birthday wrapping paper)
Cut out paper snowflakes and/or wooden, plastic or other hard snow flakes that you don't mind getting paint all over (refer here to see a video I found last week on how to cut round snowflakes)
Spray paint

Lay your wrapping paper flat (and pattern side down if reusing paper) in a well ventilated area, I used the garage floor.
If it's all wrinkly from previously being used, you can just iron it (on a low setting) flat!

Place your snowflake cut outs randomly over the paper.

Then simply spray paint everything! If you're looking for an even colouring then you'll have to go over it a few times, but I think it looks really nice when it's done just however it falls, lighter in some areas, darker in others...
If you only cut enough snow flakes to do one patch of the paper, give the paint some time to set, but then just carefully lift the snowflakes off, place in the area that still needs to be covered and go at it again with the can of spray paint.

Let it dry completely and then use as usual!
I think it looks wonderful!!!