Are you familiar with The DIY Dish?
If you're not, and you like crafty things, then you totally should be.
Way back in April of 2010 a mixed media collage was featured and I have been itching to do the photo transfer ever since.
The trouble is that I have a mad fear of commitment when it comes to hanging pictures in my home and I simply could not decide what photos I wanted to try the technique using!
Recently I decided I wanted to put some sort of Superhero pictures in Zac's room and was leaning towards vintage tin signs, however I was indecisive enough about committing to specific Superhero's I decided it was the perfect time to try the technique so I could have limitless options!
It's super simple to do and looks super cool once it's completed.
(impressed by my fancy photo up there?? yep... I'm getting pretty handy with a computer if I don't say so myself!)
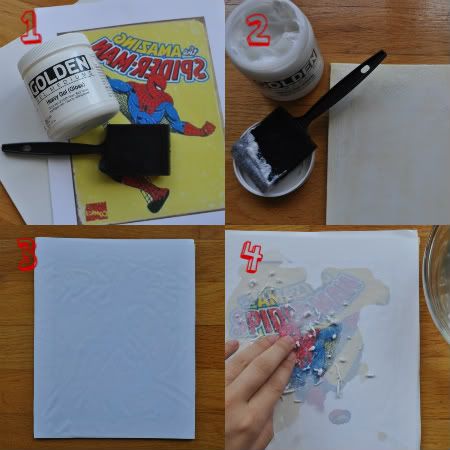
1. You'll need a painters canvas, gel medium, paint brush and your photo. Your photo must be laser printed and if it has words, printed in mirror image.
2. Cover your canvas with a thick coat of the gel medium and then press your photo, image side down, onto the medium, pushing out as many air bubbles as possible.
3. Allow to dry completely, overnight is a great time frame.
4. Dip you fingers into water and rub off the paper. This step takes some time but it's when the magic happens. Your image will stay on your canvas while you wash/scrub away all the white paper backing.

Once the canvas was dry from the water I covered it with a thin coat of mod-podge and allowed that to dry.
After the first picture was completed I got a little excited and embraced my fear of photo commitment and made a few more...

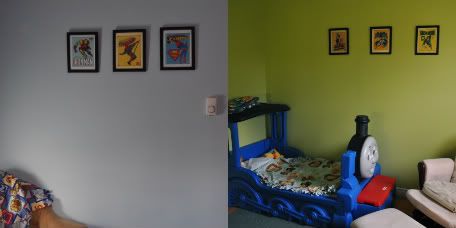
I took the glass out of a few dollar store frames and popped these babies inside for the party...

and then to hang on the walls in both boys bedrooms.
1. You'll need a painters canvas, gel medium, paint brush and your photo. Your photo must be laser printed and if it has words, printed in mirror image.
2. Cover your canvas with a thick coat of the gel medium and then press your photo, image side down, onto the medium, pushing out as many air bubbles as possible.
3. Allow to dry completely, overnight is a great time frame.
4. Dip you fingers into water and rub off the paper. This step takes some time but it's when the magic happens. Your image will stay on your canvas while you wash/scrub away all the white paper backing.

Once the canvas was dry from the water I covered it with a thin coat of mod-podge and allowed that to dry.
After the first picture was completed I got a little excited and embraced my fear of photo commitment and made a few more...

I took the glass out of a few dollar store frames and popped these babies inside for the party...

and then to hang on the walls in both boys bedrooms.
I am so excited with how nicely they turned out!
A few weeks back Elsie used this same technique on material and I couldn't help myself so I made me and the mister matching shirts, for the party, as well.

(I don't recommend washing in the washing machine though... even on the gentle cycle...)

(I don't recommend washing in the washing machine though... even on the gentle cycle...)
I'm kind of kicking myself for waiting so long to try this technique, it looks so cool when it's done and it's practically effortless!
Now to decide on the next photo to do this with!!


3 comments:
Those pictures are so neat. I've been wanting to make some pictures to hang on my daughters walls. What exactly is the gel medium? I'd like to try this. Also is it just a canvas like the type for oil painting?
Veronica - yes, the canvas is just a plain ol' canvas for oil painting, I actually bought mine at the dollar store. And the gel medium is just that. I was really confused too but it's actually called "Gel Medium" and it's sold with the oil paints in your craft store.
Thanks. I'm going to try this.
Post a Comment